Monday, March 09, 2009

Art auction

My brother Ben and his friend D.W. Alexander are working on raising money for their next film production, Id and Emma, which they will begin shooting in April. They have asked artists that they know to donate artwork for the auction and we’ve listed them on ebay (see the links below).

They are also donating 20% of the money raised from the auction for the Colorado Sickle Cell Foundation to honor a friend who is fighting the disease.


In this photo, D.W. is filming from the tower at East High School in Denver, Colorado, which will be a location in Id and Emma.

Please take a look at these items for auction, bid on ones you like, and forward this link to your friends and family. We really appreciate your support!

Updated 04-14-09--thanks everyone! So far, Ben and D.W. have earned $220.00 as well as $60 for the Colorado Sickle Cell Foundation.

These paintings are still available and have been relisted on eBay:


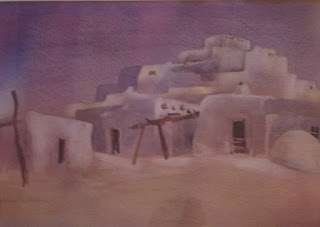
El Pueblo by Patricia Barr Clarke.


Rainbow Shell #8 by Tanya L. Hayes.


The Reading Room by Benjamin Sherif Clarke


Figure Study by Benjamin Sherif Clarke


Not Just One or the Other by Laura Brady


Stirling Castle by Noell Custer

Books by Mark A. Clarke, Barbara Dobson, and Sandra Silberstein

One copy of the 5th edition of
Reader's Choice


Choice Readings

Books by Mark A. Clarke


A Place to Stand


Common Ground, Contested Territory

Monday, January 26, 2009

Too big, too small...what about just right?


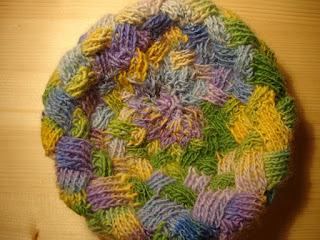
I decided to full the hat--it is still a bit big, but wearable. Here it is before and after fulling.


I also started one for Hannah. The first one I cast on, I over compensated and made it too small, so I had to frog it and start over. The second one fits her pretty well--though it doesn't cover her ears completely. I'd show you a photo on her, but I'm not quick enough to photograph it before she whips it off her head. She does say she likes it and will wear it when it is cold out . . . we'll see. We got some lovely snow last night, so we'll have an opportunity this morning to try out our new hats in cold weather.

Monday, January 19, 2009

This is what I get for feeling so clever


As a reward for finally finishing my dad's sweater, I'm making myself a hat. I chose this one. I read on Ravelry that some versions were coming out a little bigger than expected--so I followed the gauge for a smaller hat. I do have a head that measures on the larger side of things. Yep, 22 1/2 inches--this is usually the last size on hat charts for women.


I spun one singles from this lovely Bluefaced Leicester from Dragonfibers on etsy and the other singles from Bonkers Handmade Originals Tencel/Merino that I bought at the Estes Park Wool Market this summer.

I was feeling clever because I had not only figured out how to do entrelac, but I was also knitting backwards to make it go faster. All weekend I was wishing that someone who knew a thing or two about knitting would stop by and notice that I was knitting backwards. But sadly, no one noticed. And even when I pointed it out, they didn't seem too impressed.
And, since I was knitting from singles, I had devised a portable lazy kate to hold a single bobbin. This is apparently too much cleverness for one person.


So this is what I get for feeling so clever.

Options at this point:
1. Start over.
2. Keep going and finish, then full it until it is the right size.
3. Make it into a bag.

Tuesday, January 13, 2009

Project completed!


Yes, it is true. This is a photo of my dad wearing his sweater, started in November of 1996, completed this weekend and delivered to my dad on Sunday. He and my mom are taking turns reading books to Hannah, doted-upon-grandchild-that-she-is.

Dad asked to have me holding the knitting needles in the photo--I've already cast-on a hat for myself as a "you-did-it!" reward.

I was worried that the sweater was going to be too large, but it turned out to be the kind of sweater that looked good on several people of different body types who tried it on and it fits my dad perfectly. He said he's never going to take it off now that he has it. We're a bit prone to exaggeration in my family--but I like that he liked it so much to say something like that. I wonder if I could, like, fit the word like into that sentence one more time. Like, that would be really funny.

Thursday, January 08, 2009

Seaming the 10- (ahem 12-) year cardigan


I'm nearly done seaming my Dad's sweater. I really shouldn't be talking about it until it is blocked and on his back as every time it seems like I'm close to finishing I discover things--like that the back was 2-inches longer than the fronts, or that I had run out of yarn (fortunately, remedied when I frogged the back!). I guess there are reasons why it is a 12-year sweater.

Sunday, January 04, 2009

More ornaments


First off--Happy New Year everyone!
I'm still in an ornament making frenzy. My Aunt Lise gave us the cutest Christmas tree wall hanging a few years ago with a little pocket for each day of December until Christmas--to count off the days. It came with candy--one candy in each pocket, one piece of candy for each day until Christmas. That's a lot of candy for a baby (or anyone for that matter)--so this year I placed a small ornament in each pocket and Hannah and I had great fun counting the days and putting an ornament on the tree each day.


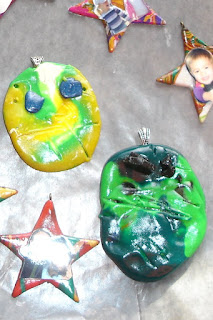
But I had an idea--and for next year I'm making 25 ornaments (well, now I have 30+), each with a photo of our family and friends on a star shaped ornament (I used a toy cookie cutter)--and we'll decorate the tree with their wonderful faces.


This idea meant that I needed to buy more polymer clay.


Hannah made ornaments, too. They are portraits--the yellow one is Hannah, the green one is of me.

Monday, December 22, 2008

Make your own gift bags


My 3 1/2 year old daughter often comes home from day care with lots of paintings--they are great and I love each one--but they are starting to pile up. I had an idea for a way to use them so that we could share them with family and friends. We're making them into gift bags this holiday season!

The bonus is that this is an easy project to do with small children--just make sure they are safe with the scissors and not eating the glue. When I was making these with Hannah, I did the folding and she did the gluing.


Materials:
Paper to recycle (the larger the paper, the larger the gift bags--so 11x17 inches and up is nice if it is available)
Glue stick
Scissors
Paper craft rope

Rim

Start by creating the top edge of the bag along the long side of the paper. Fold in 1/2 inch and glue closed.


Next turn paper so that the rim is on the left edge and start folding the sides--the first side will be about 4 inches wide, then the face of the bag (about 6 inches wide), then another 4-inch wide side, followed by a 6-inch wide back.

If your paper has a lot of paint on it, it might tear when it is being folded--simply glue a patch to the inside of the bag with a piece of extra paper.


Last fold 1/2 inch overlap flap and cut off the excess paper. Save the excess paper for glueing in the paper rope handles later.

Glue the paper flap around the corner of the first side that you folded. Now you have a rectangular tube.


Bottom of the bag
Create the bottom of the bag, by cutting along the folds of the bag on the bottom about two inches in.


Fold in the flaps, then apply glue to the two long flaps and fold them in and secure the flaps.
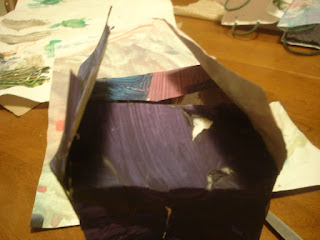

Trace around the bottom of the bag on a piece of the extra paper and cut it to size. Apply glue to the underside and place it inside the bag on the bottom.


Handles
Make a paper flap to hold down the handles with the excess paper. Cut 2 3 x6 inch strips and fold in the two edges as pictured and glue down the folded edges. Apply glue to the back.

Cut two 6-inch pieces of paper rope and bend to a rounded, handle shape.


Glue to the insides of the bag with the paper flap, pressing firmly around the paper rope so that it stays in place.


Allow to dry, then fill your bag with goodies to give to your friends.

Monday, December 15, 2008

Making things


This is the time of year that I really, really get an urge to make things. The thing is that I have this urge constantly throughout the year--it is just intensified when the snow begins to fall.

This weekend I gave into those urges and had fun with Hannah as well. We played with polymer clay and made ornaments for our very tiny Christmas tree. It is so easy and fun, I thought I'd share the how-to part with you.

Roll out shapes of polymer clay (we used Sculpey) for your ornaments. We used a little rolling pin (one of Hannah's) to make them flat--but they also sell special rolling pins for polymer clay.

I had some metal bails that I stuck into the clay to make pendant--but poking a hole works, too.


I cut out photographs and stuck them on the ornaments and baked them (it worked!) following the directions on the polymer clay package in the oven for 15 minutes at 275 degrees F.
After they had cooled, I painted them with Sculpey Glaze and let them dry. I applied 2 coats to the front and one to the back.


After the ornaments dried, I strung a piece of ribbon through the hole and then added a little wire hook made with my wire working tools and hung the ornaments on our little tree.